Due to reasons, and slowly deciding to consolidate all my material into one place, I will slowly be migrating content from here to http://0x27.me/. Slowly, because converting WordPress to Jekyll by hand is a right pain in the arse.
No new content will be published here, but current content will be kept here for archival purposes. All new content goes over on the new site.
I was not going to bother posting this up, as it lacks in pretty pictures, but ah well. Ended up publishing it on one of the forums and figured it was worth hosting here… I decided to be a bit more “descriptive” to make up for the lack of pictures!
Part 1: Oxidation of Borneol to Camphor.
Oxidation reactions are useful mechanisms for converting one functional group in an organic compound to another. Notably, the conversion of 1* alcohols to aldehydes or acids, and conversion of 2* alcohols to ketones.
You can also do things like oxidize an amine to a nitro group (I was never able to confirm this, as back then I did not have a FTIR at my disposal, but I believe it worked, your mileage may vary – some experimental procedures use this route), and the likes.
Oxidation occurs when protons (Hydrogen) is stripped away from a compound, often replacing it with oxygen. Hence oxidation. We use an oxidizing agent to perform this.
In this experiment, we use H2SO4/Na2Cr2O7 as our oxidizing agent, to convert Borneol (a secondary alcohol) to Camphor (a ketone). This is a strong oxidizing agent, and also a suspected carcinogen, so it must be
handled with care. Spills of such material are a serious hazard [1].
Experimental/Cooking (Jesse! We need to cook!):
1. 2 grams of sodium dichromate were dissolved in 8ml distilled water, and slowly ~1.6ml of concentrated sulphuric acid was added. I may have used a slight excess of acid due to being distracted. This was left in the ice bath to cool.
2. 0.9870 grams of borneol was weighed out carefully on an analytical balance. It should have been a gram, but I was in a hurry as there were only 4 balances, and 17 people vying for them, so I was urged to “hurry the hell up”. This was dissolved in 5ml of diethylether in a 25ml erlenmeyer flask, and stirred. You would not believe how much of a pain in the arse it is to dissolve such a tiny amount of stuff in a tiny bloody container. The instructions called for 4ml of the ether, but an extra 1ml was used to wash borneol stuck to sides of it in. This was left in the ice bath to cool. At this point, a few sachets of salt were added to the ice to help with cooling.
3. Over the course of approximately 10 minutes, 6ml of the oxidizing solution was added to the borneol/ether solution with stirring and cooling to keep it chilled. After the addition was completed, further stirring/swirling/swearing was done for about 5 minutes.
4. The mixture was put into a seperatory funnel of capacity 150ml, with the flask rinsed a few times with small amounts of ether and water to get all of the material into the seperatory funnel. Some more water (10ml or so) was added to the seperatory funnel. This was done very carefully, again, see [1] for why. The seperatory funnel was vigorously shaken with repeated venting to prevent it exploding from pressure (having seen this happen before), and left on a retort stand to settle.
5. Once settled, the lower aqueous layer was drained off into one container. The ether layer was then transferred to a small beaker.
6. The aqueous layer was put back into the sep. funnel, some more ether added (around 15ml), and again shaken, swirled, vented, and let settle. The ether layer was combined with the other ether layer in the small beaker. This was repeated again (aqueous layer returned and separated, keeping ether layers together) a total of 4 times. Instructions specified 2, but I was unhappy with the “colour” of the layers. This is hard to explain, but it “seemed right” based on experience separating/extracting mixtures.
7. The combined ether layers were put into the seperatory funnel (a fair bit of the ether had evaporated over time, reducing its volume a bit), and it was washed first with 20ml of water, twice with 20ml of 5% bicarb, and again twice with water. Each time, the ether layer was returned to the funnel, with “a bit” (2 pasteur pipette loads) of ether added each time.
8. The ether layer was placed into a clean, dry erlenmeyer flask, and a lot of magnesium sulphate added (heaped spatula loads), until it no longer formed clumps with considerable stirring, but remained as a powder. The MgSO4 was anhydrous/dry, and was there to absorb the water. It forms clumps with water, hence when no more clumps formed, it was considered dry.
9. The ether layer was filtered out and retained, the residue discarded. The ether layer was placed in a small evaporating dish and heated on a steam bath until the ether evaporated. This was a visually impressive spectacle (probably amplified by a nonfunctioning fumehood leading to inhalation of fumes…), with it “bubbling up” and forming “powder bubbles” as the last of the ether evaporated.
10. The crude camphor was then weighed.
11. Using a sublimation apparatus (which looks suspiciously like a piece of drug paphernalia), the camphor was purified by subliming/recrystallizing it. This was also incredibly visually impressive, the initial evaporation and condensation looked somewhat akin to the process that occurs in an incredibly well cooled waterpipe.
12. The sublimed/purified camphor was then weighed and analysed using the FT-IR machine, which, because the computer attached to it runs Windows XP Service Pack 1, took a few attempts to get it to “just bloody work” and give me a graph. The graph is attached as a photograph, lightly annotated (the C=O peak highlighted).
Results:
Mass Borneol Used: 0.9870g
Theoretical Yield: 0.9805g
Mass Camphor (Crude): 0.5281g
Mass Camphor (Pure?): 0.4454g
Actual Yield (Crude): 53.51%
Actual Yield (Pure?): 45.13%
Mm Borneol: 154.25g/mol
Mm Camphor: 153.23g/mol
Reference/Notes/Silly things:
[1] The guy working beside me did not exercise due care while putting the reaction mixture into a seperatory funnel, forgetting to check was the bloody valve closed. As expected, the reaction mixture went absolutely fucking everywhere, making a strange “bubbling” as it hit the table (a plastic coating on the table I think?). The lab techs reacted in a fashion I would expect if he spilled pure bloody cyanide everywhere, decontaminating it with bicarb and such
Also, amusingly, the table is still stained despite repeated washings with bicarb, acetone, and water. Brown “burns” on the surface, which I suspect were caused by it being oxidized.
Clifford Sullivan (@cliffsull on twitter) recently asked how to go about
safely accepting password input from an interactive program in python.
As you may know, password inputs are generally “masked”, so the password
is not echoed back to the screen. This is “kind of fucking important” as
an attempt at defending against shoulder surfers and other evildoers.
Anyway, in python, there is a module named “getpass” that serves this
exact purpose. It is part of the python standard library, so no need to
go pip installing it or anything just yet.
Darren (@info_dox on twitter) sent a simple solution showing how
this works. I figured it might be useful to make note of it here just so
you can see how trivial it is to safely accept user input, and perhaps
write a demo app using python-paramiko showing how this might be used
in practice.
This file contains bidirectional Unicode text that may be interpreted or compiled differently than what appears below. To review, open the file in an editor that reveals hidden Unicode characters.
Learn more about bidirectional Unicode characters
Now, to show use with Paramiko, say we want to write a program that logs
into a remote host, checks uptime, and displays the uptime for you.
In this example, we use raw_input to do this. raw_input is not a good
idea for accepting passwords as it echoes back to the terminal, but it
is fine for usernames.
This file contains bidirectional Unicode text that may be interpreted or compiled differently than what appears below. To review, open the file in an editor that reveals hidden Unicode characters.
Learn more about bidirectional Unicode characters
This file contains bidirectional Unicode text that may be interpreted or compiled differently than what appears below. To review, open the file in an editor that reveals hidden Unicode characters.
Learn more about bidirectional Unicode characters
So instead, we use getpass.getpass to do this, and it is a far more safe
way to accept the password.
This file contains bidirectional Unicode text that may be interpreted or compiled differently than what appears below. To review, open the file in an editor that reveals hidden Unicode characters.
Learn more about bidirectional Unicode characters
As you can see, it does NOT echo back the password to the terminal!
This file contains bidirectional Unicode text that may be interpreted or compiled differently than what appears below. To review, open the file in an editor that reveals hidden Unicode characters.
Learn more about bidirectional Unicode characters
A reminder about Steam. Those of you who gamed in the early 2000’s, as I did, may remember the inception of the Steam platform.
A buggy, hideous DRM solution Valve bundled Half Life 2, the most awaited game ever, in, to prevent piracy.
Valve made many loud noises at the time about ‘digital distribution’, ‘direct to consumer’ and other pretty buzz-words, but everyone and their dog knew the reason Steam existed was to stop piracy.
You see, before the game was released, its source code leaked. A German hacker, Axel Gembe (spelling?!), author of the infamous Agobot malware, had supposedly popped valve and nicked it. Others accused Max Vision, later known as Iceman and founder of a black market for creditcards. Either way, valves warez got leaked. And by god they were not happy.
So Valve encumbered its fans with this hideous download application that seemed to constantly ‘update’ itself with new bugs, took days to get working (many gamers were NOT on broadband at the time, myself and many compatriots would be on dial up until the late 2000’s), and refused to work offline. Remember all the butthurt over the Xbox One’s always online thing? Yeah. Imagine that as a kid on dial up. Someone picks up the phone – game dies. Steams servers would occasionally be unreachable for seemingly no reason, game updates would happen nearly every other day and render the game unplayable for hours, and the Steam application would crash more regularly than IE6.
Steam was an ‘innovation’ in DRM tech, and to this day, it remains a reasonably painful affair to crack Steam games. It is totally doable (I just cracked Skyrim as an academic exercise), but annoying as fuck. Valve, by releasing Steam as their distribution platform, ensured that piracy of their products would be kept to a bare minimum.
For a fair while, Steam stagnated. A handful of games were ‘Steam Enabled’, but it had yet to… Pick up steam. Eventually, it fucking exploded. Almost every game imaginable was available via Steam, or could be imported into Steam, and Valve had basically cornered the digital distribution market with their product, which started out as an evil DRM platform.
Today (as in, recently. This sat in the post queue for a while), Valve are announcing the ‘Open’ and ‘Hackable’ Steam Controller and SteamBox, as well as the Ubuntu (ew! Ubuntu is the worst possible distro for it!) based SteamOS. They have entered the console gaming market, and taken their Steam with them, knowing their (now usable) digital distribution system will earn them a dickload of money. Furthermore, the ‘social’ aspects of Steam (actually quite revolutionary/inspired, as well as revolting) mean that it is geared perfectly for the multi-player gaming market, giving them a strong contender against the Xbox Live and PSN platforms. To make their case stronger, the players on SteamOS/Steambox consoles will be able to play with their friends on the PC platform, a feature decidedly lacking in other consoles to the best of my knowledge.
What strikes me as odd is how the open source community is welcoming this arrival of what is basically a DRM product to the ‘open source’ fold. Such a product is completely antithetical to the aims of the F/OSS community, which prides itself on freedom, lack of pointless DRM/restriction, and openness. Such a product is, by design, neither free, open, or unrestricted. It is a mechanism of control, and the idea of it becoming a major contender in the Linux market is quite frankly, horrifying.
Nontheless, I will doubtlessly go on to commit acts of extreme hypocrisy and buy a steambox myself. You know why? Convenience.
So, in previous experiments we created Hexamminenickel (II) Chloride complex, and then determined the percentage Nickel in the complex via gravimetric analysis.
This time around we do a titration to determine the percentage Ammonia in the complex. This is done via an acid-base back-titration. We liberate the Ammonia from the complex by dissolution in water, then react with excess HCl to bind all the ammonia as NH4Cl, then use acid-base titration to determine the amount of ‘left over’ HCl is in solution. Fairly simple!
Reactions Used:
[Ni(NH3)6] + 6H2O -> [Ni(H2O)6] + 6NH3
HCl (aq) + NH3 (aq) -> NH4Cl (aq)
HCl (aq) + NaOH (aq) -> NaOH (aq) + H2O
Experimental:
1. 20ml of 2M HCl was pipetted into a 100ml beaker, in which 0.9999g of the Hexamminenickel (II) Chloride was dissolved with stirring. It was transferred to a 100ml
volumentric flask with rinsings and made up to the mark with distilled water. This is Solution A.
HCl and Hexamminenickel (II) Chloride
Dissolving – the NH3 is released and soln turns green
2. 20ml of Soln. A was pipetted into a 250ml conical flask and titrated against 0.1000M NaOH soln. in the presence of methyl red indicator. This step was repeated until 3 consistent titres were obtained.
Indicator and solution
Indicator added, ready to titrate!
Endpoint Reached.
Results:
Mass [Ni(NH3)6]Cl2 used: 0.9999g [NaOH] in burette: 0.1000M Average Titre: 29.50ml % NH3: 43%
Theoretically, the % NH3 should be 44.086%, so our result of 43% is 97.53% accurate, which is not bad, considering it had been 6 months or so since my last titration!
This post is “an idiots guide to dicts”, or, how I managed to wrap my head around dictionaries in python.
A dictionary, or dict, in python, is a “table” of Key: Value pairs. For each key, there is a corresponding value.
The following gist shows a dict containing 3 items, and printing out the value of one of them.
This file contains bidirectional Unicode text that may be interpreted or compiled differently than what appears below. To review, open the file in an editor that reveals hidden Unicode characters.
Learn more about bidirectional Unicode characters
[packetforger@methlab ~]$ python simpleread.py cat
meow
[packetforger@methlab ~]$ python simpleread.py dog
woof
[packetforger@methlab ~]$ python simpleread.py rat
squeak
Now, dicts can be very useful for storing variables for stuff. For example, if we want to add headers to a HTTP request using requests or requesocks, as we saw here, we simply supply our additional headers in a dictionary
and pass it using the “headers” option.
Now, this simply demonstrates reading from dictionaries. When I could be bothered, I will write about adding to dictionaries.
In my last post, I showed the synthesis of Hexamminenickel (II)
Chloride. In this follow-up, I wish to show how we determined the
percentage of nickel in the resultant product via gravimentric
analysis using butandionedioxime (dimethyl gyoxime).
The reagent forms a red, square planar complex with Ni2+ in slightly
alkaline solution.
Structure of the complex:
Structure of Complex
A given mass of the “purple complex” (i.e. the Hexamminenickel (II)
Chloride) is dissolved in water, reacted with the butandionedioxime,
and the precipitate collected and weighed. By doing some additional
mathematics, we can use this to determine the amount of nickel in
the precipitate, and therefore, the amount in the “purple complex”.
Experimental:
A sintered glass crucible (porosity 4) is cleaned, dried and its
mass taken to 4 decimal places.
100ml of distilled water was poured into a 500ml beaker, and 5ml
of 6M HCl was added.
0.2993g of Hexamminenickel (II) Chloride was added to the HCl
solution with rinsings, and the solution diluted to ~200ml with more
distilled water.
The solution was stirred to dissolve the Hexamminenickel (II) Chloride,
which dissolved readily. The solution was then heated to 75*C and 35ml
butandionedioxime added with stirring.
Approx 15ml or so of concentrated NH3 solution (aqueous) was added to
the solution with stirring. A further ~20 drops were added once a permanent red precipitate was obtained.
The solution was re-heated to 75*C and left for 25 minutes to permit the
precipitate to coagulate.
A drop of 2M NH3 soln. was injected into the clear part of the soln. to
test if further precipitation would occur. No further precipitation was
observed, so the precipitate was left to stand at room temp for 45 minutes.
The precipitate was filtered using the crucible previously dried and weighed under vacuum, and washed with 100ml of distilled water.
The crucible was placed in an oven and left there overnight as I realized on checking after an hour that the precipitate was not yet fully dried, hence, I decided to come back the next day upon realizing the “wet” measurements had completely screwed up my calculations.
The crucible, when dry completely, was weighed to 4 decimal places on an analytical balance (the kind dealers wish they had!).
Reacting
Filtering. Took ages due to tiny crucible.
About to dry
Results:
Mass of [Ni(NH3)6]Cl2 weighed out: 0.2993g
Dry mass of sintered glass crucible: 10.3840g
Mass of the crucible + red ppt: 10.7336g
Mass of the red precipitate: 0.3496g
Molecular formula of red ppt: NiN4C8H14O4
Molecular mass of red ppt: 288.917g mol-1
%Ni in the red precipitate: 20.314%
Mass of Nickel in red ppt: 0.071g
%Nickel in the [Ni(NH3)6]Cl2 complex: 23.72%
Full Disclosure regarding the writeups: I will be borrowing heavily from the
laboratory notes and lecture notes of my college and lecturers (who will be
un-named for security and privacy reasons) while writing up the experiments I perform in said institute on this blog. Most of the reason I actually do these writeups is as a study aid for myself, and also because I like having an excuse to take photographs during labs. I take no credit for the originality of the work I present here, as most of it would not happen without the help of the excellent teaching staff. I would actually simply post OCR’d photocopies of my lab notebook with additional photographs, but I suspect that would be overstepping some kind of ethical line, so instead I do my best to reword things in an understandable (to myself) fashion and describe how things actually were done in the lab. Sometimes though, the description from notes simply is the best one there is.
If any of my lecturers happen to stumble across this, thanks for tolerating
the not-so-stealthy taking photos of chemicals and suchlike 😉
Finally, the most excellent Taylor Swift/Breaking Bad parody:
This is a brief version of a lab writeup I recently performed. Mostly putting it here as I found it interesting, and because, really, chemistry is bloody awesome.
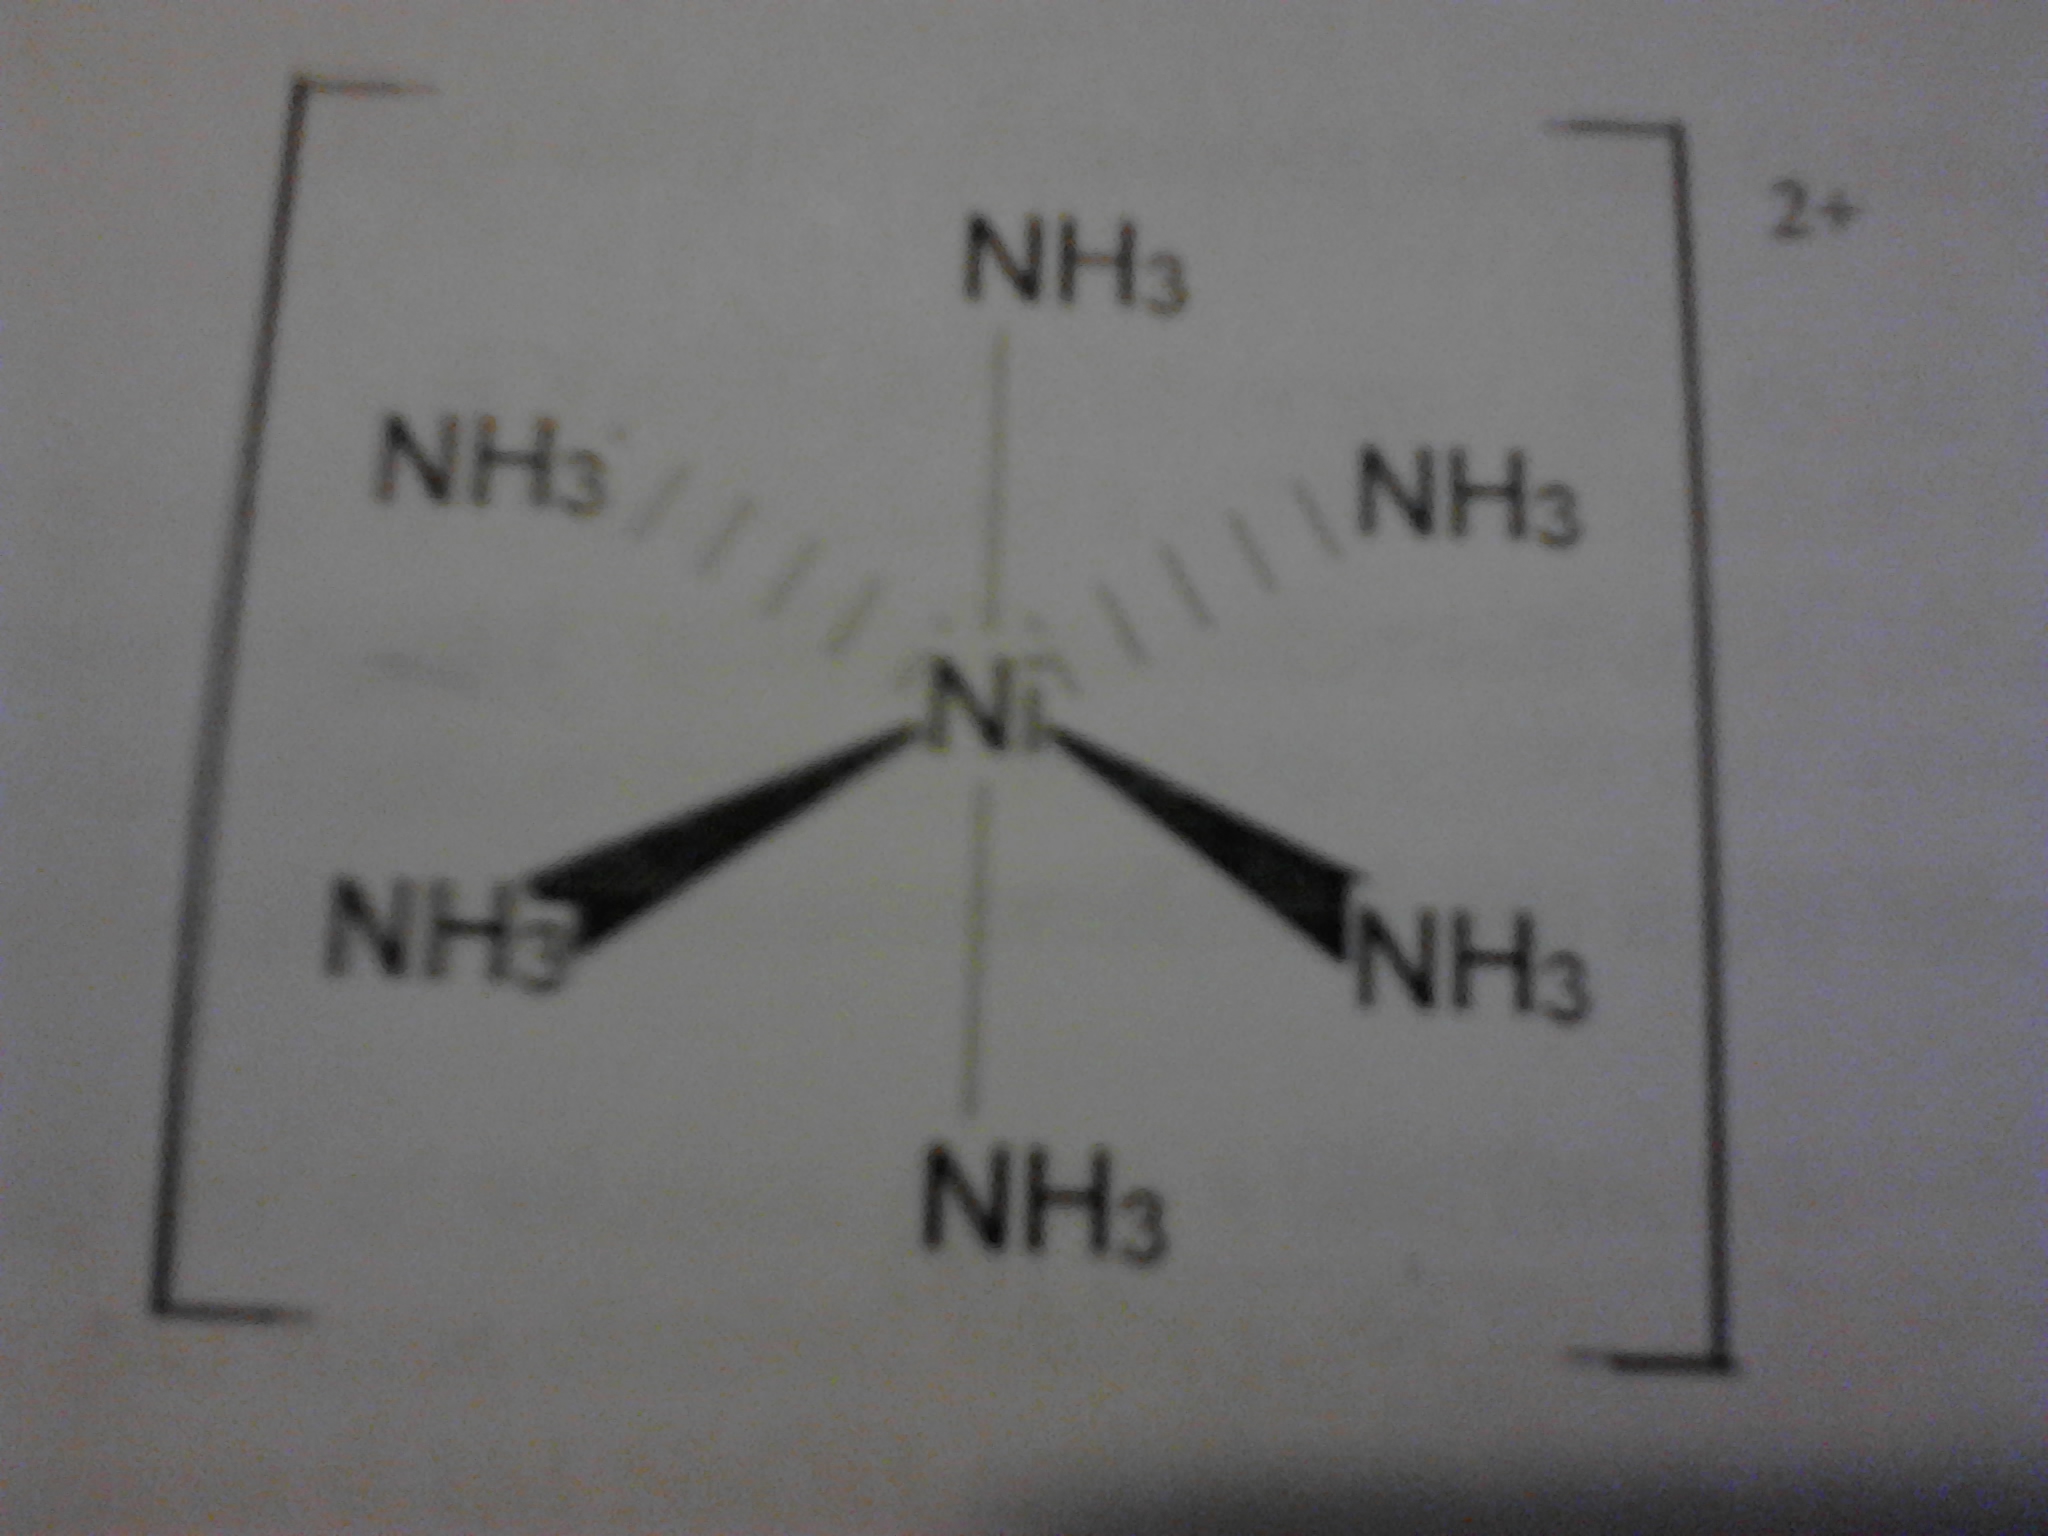
So. We are preparing [Ni(NH3)6]Cl2 in this experiment. We do so using the following reaction.
The hexammine complex is less soluble than the aqua ion and precipitates out as the chloride salt. Seeing as we started with NiCl2.6H2O there is already chloride anions in the rxn. mixture.
The Nickel ions in the NiCl2.6H2O are hydrated when dissolved, forming the green octahedral complex [Ni(H2O)6]2+. The water molecules in the complex are easily displaced by the excess Ammonia to form our final product.
The below image (I apologise for shitty camerawork, my good camera is broken) shows the structure of the complex we wish to obtain.
Structure of complex
Synthesis (or rather, cooking):
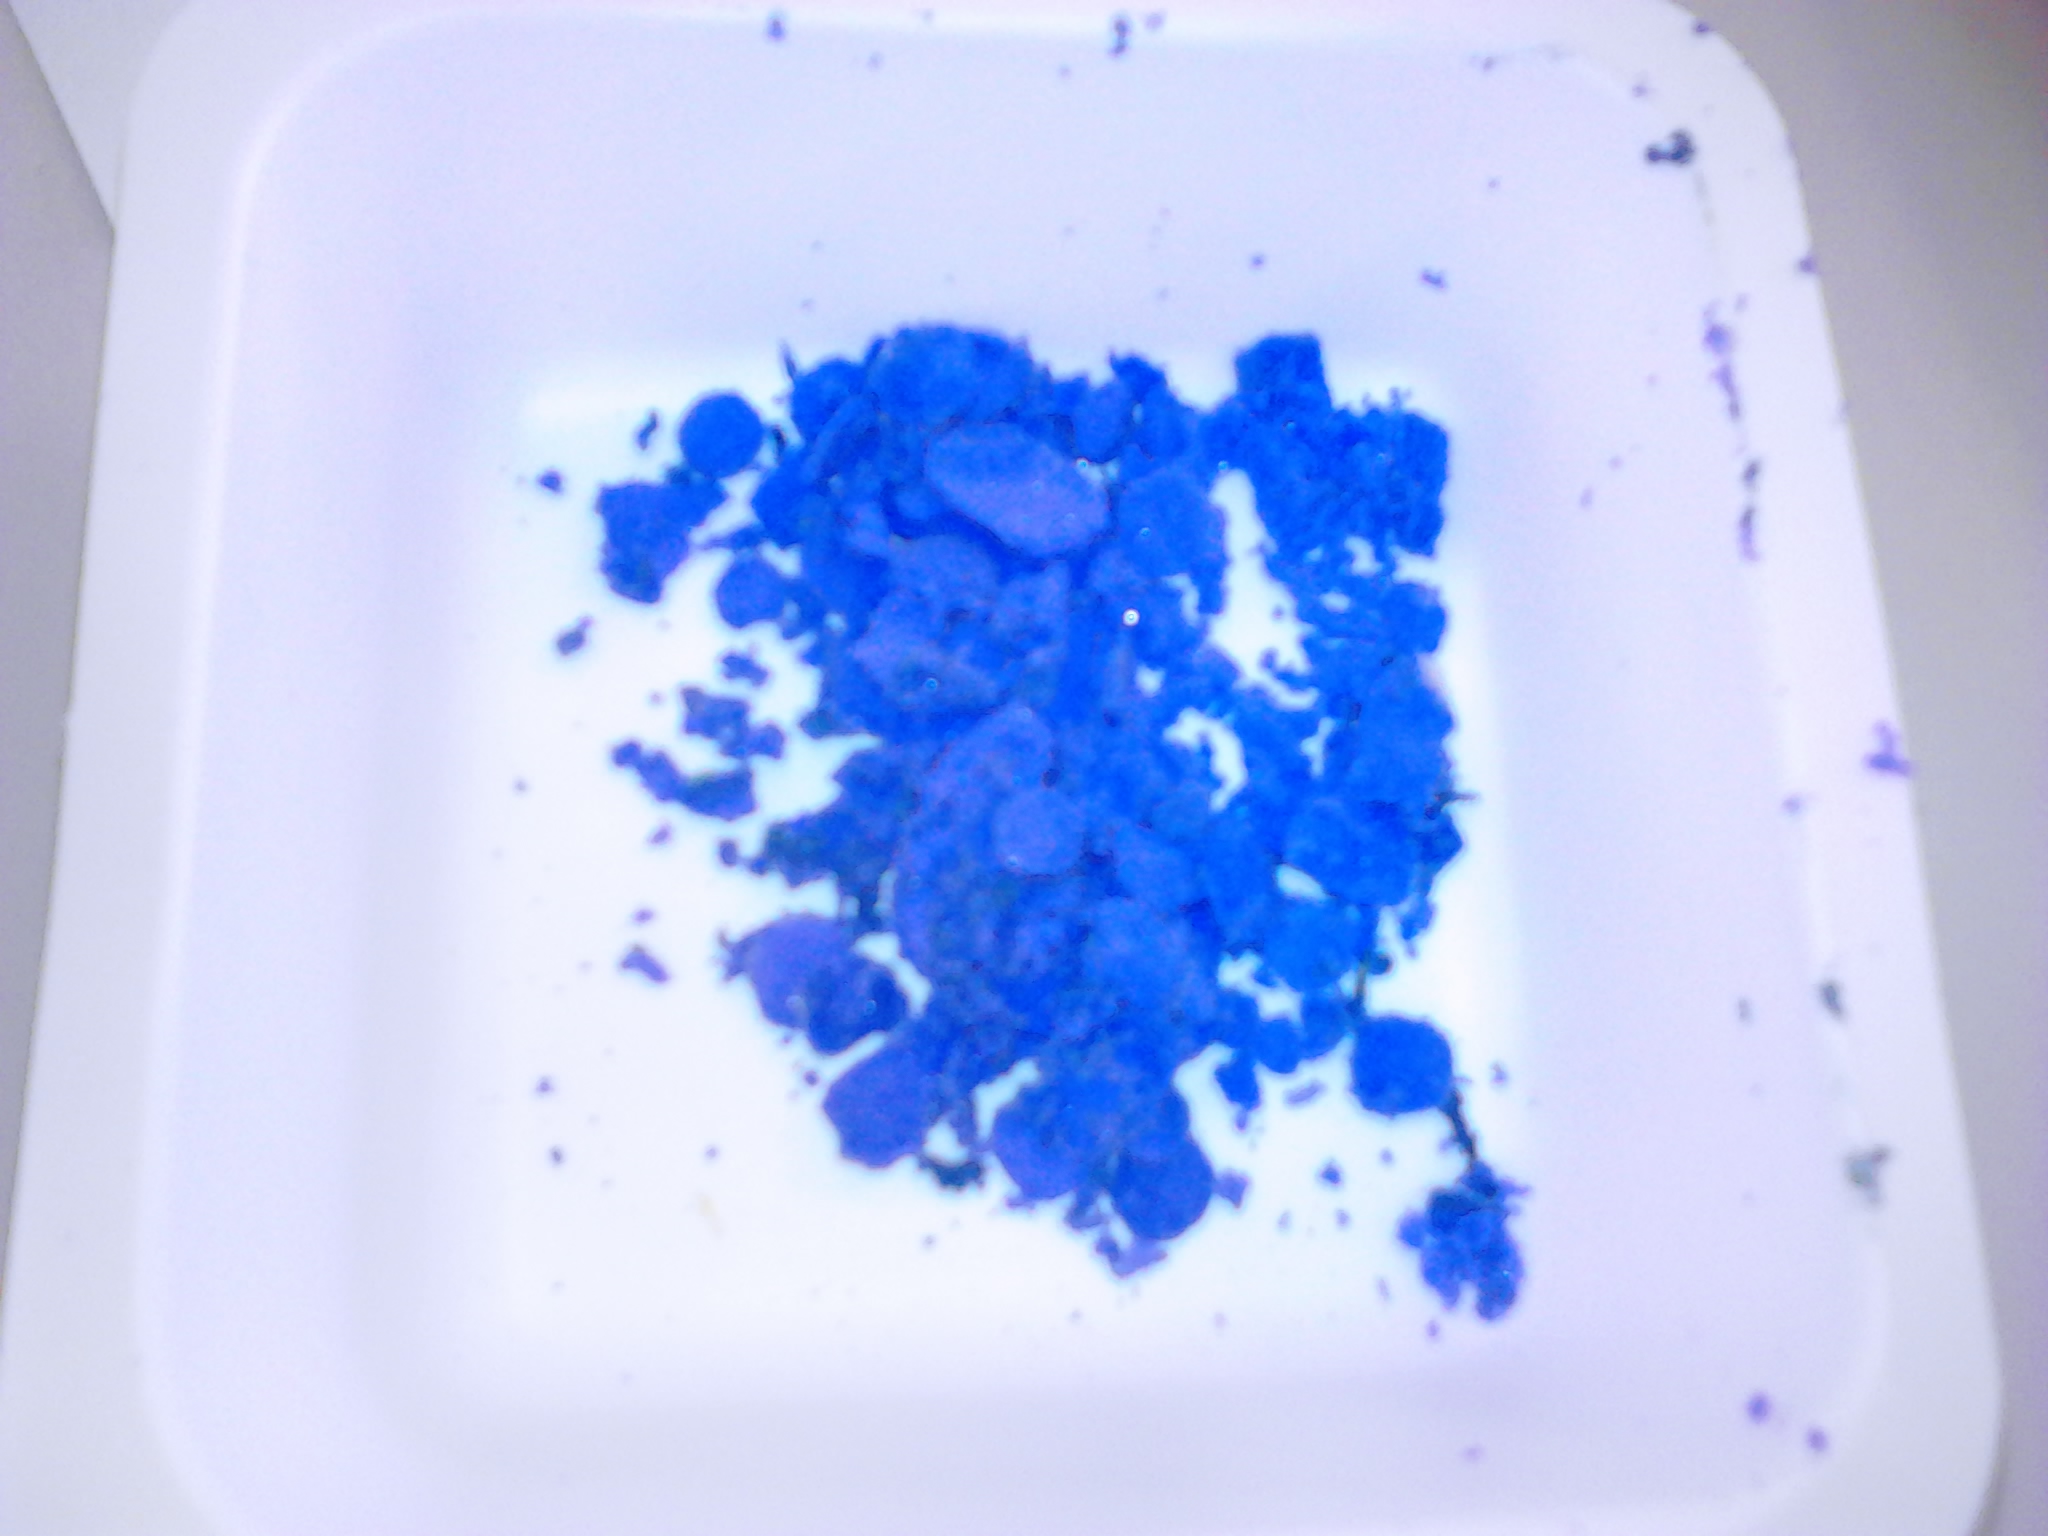
5.996g of Nickel Chloride Hexahydrate was dissolved in 10ml of distilled water with stirring.
In a fume hood, 16ml of conc. aqueous Ammonia was added slowly with vigorous stirring. A blue/green precipitate was observed, along with evolution of significant heat. This precipitate slowly turned into purple crystals as more ammonia was added.
The soln. was allowed to stand for 15 minutes to permit precipitation to complete. Once precipitation was complete, and a layer of crystals observed on the bottom of rxn. vessel, the soln. was vaccum filtered with a Buchner funnel.
The residue was washed first with 40ml Acetone, followed by 40ml of Ether. It was then permitted to dry under vaccum for 20 minutes.
Residue was collected and weighed.
Theoretical Yield: 5.8479g Actual Yield: 2.1685g Percentage Yield: 37.081%
Not the best yield, but considering it had been a while since I had been in the lab, not so bad! The above photo of the product is slightly too much white, due to the flash on my phone-camera whiting it out. It is actually a more purple coloured product.
Expect more chemistry posts here, as I hope to get a lot of lab-time this year and make some nice colourful things 🙂
So, hopefully someone noticed the glaring logic error in the port scanning utility I posted in my last post on SCAPY, now I am going to show how to fix it.
The tool shown accepted ANY reply from a tested port as a “yes, this is open”. Even an RST saying the port was closed. The reason I left it broken is fairly obvious – so I could do a followup explaining what a noob mistake it is 😉
The following snippet of code sends a SYN packet to a defined IP and port, and if it recieves a SYN-ACK packet in return, reports the port as actually open. If it recieves any other kind of packet, it reports the port is in fact closed.
This file contains bidirectional Unicode text that may be interpreted or compiled differently than what appears below. To review, open the file in an editor that reveals hidden Unicode characters.
Learn more about bidirectional Unicode characters
Modifying this code to allow for en-masse scanning is left as an exercise for the reader. I am instead going to write something about using threads next.
First though, I have to figure out how to make threading work properly without forkbombing the ever living shit out of my box!
You may have noticed by now that Python’s Requests, and Requesocks,
library send a default user-agent. This can be a pain in the arse when
such things as a WAF blocks said useragent, or when you are attempting
to inject code via an User-Agent header.
It turns out, changing the default user-agent is actually fairly simple.
You can supply header’s using the headers=headers parameter in the HTTP request, where “headers” is a dictionary of headers you wish to send.
For example:
>>> import requests
>>> headers = {
... 'User-Agent': 'Firefucked, because packetforger doesnt have a FF
ua handy'
... }
>>> r = requests.get("http://ifconfig.me/ua", headers=headers)
>>> print r.text
Firefucked, because packetforger doesnt have a FF ua handy

>>>
See? Changing the User-Agent header is trivial!
Now, obviously we can add whatever other headers we want, in a dictionary format. This can be useful for doing SQL injection attacks via headers, etc.
Now, we shall use this to write an exploit for the “Linux/Cdorked” backdoor, which will grant us remote code execution on any host infected with this backdoor.
If someone comes up with a reliable way to scan for these backdoored boxen, please do let me know 😉
This file contains bidirectional Unicode text that may be interpreted or compiled differently than what appears below. To review, open the file in an editor that reveals hidden Unicode characters.
Learn more about bidirectional Unicode characters